 1986-1991 MERCEDES-BENZ ENGINE TUNE UP INFORMATION
STELLAR ENTERPRISE LLC, MICHIGAN - AUTO TREND REPAIRS & SERVICE
www.autotrend.us www.126world.com www.benzworld.us http://autotrend.activeboard.com www.sellc.us
1986-1991 MERCEDES-BENZ ENGINE TUNE UP INFORMATION
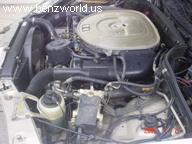
M116 420 SE - SEL and M117 560 SE - SEC - SEL - SL V8 ENGINE

 Visit our
online forum
http://autotrend.activeboard.com for help
Visit our
online forum
http://autotrend.activeboard.com for help
BUY A MAJOR TUNE UP KIT FROM AUTO-TREND REPAIRS AND SERVICE! CLICK HERE $399.99 + Shipping
![]()
![]() We also take
Visa and MasterCard -
sales@benzworld.us
We also take
Visa and MasterCard -
sales@benzworld.us
_______________________________________________________________________________________________________
Mercedes-Benz Quick Tune-up Specs -
1986-1991
Mercedes-Benz 420 V8 M116 Engines-
BOSCH SUPER SPARK PLUG #7905 @ .032-.035 gap O.E.
1986-1991 Mercedes-Benz 560 V8 M117 Engines-
BOSCH SUPER SPARK PLUG #7911 @ .032-.035 gap O.E.
FIRING ORDER ---> 1-5-4-8-6-3-7-2
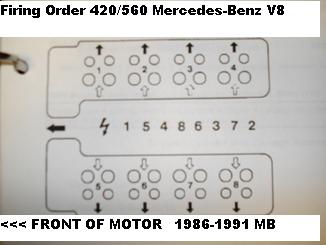 Firing order for 1986-1991 Mercedes-Benz 420/560 SOHC
and DOHC V8 Engines.
Firing order for 1986-1991 Mercedes-Benz 420/560 SOHC
and DOHC V8 Engines.
IGNITION TIMING (BTDC) Most all 420/560 models
At Idle (without vacuum) 3-7 deg. BASE (with vac) 10-14 deg. (3500RPM w/o vac) 24-28 deg. (3500RPM w/ vac) 40-44 deg.
Ignition timing is computer controlled and not adjustable on 1986-1991 Mercedes-Benz V8 M116/420 and M117/560 V8 Engines!
_____________________________________________________________________________________________________________________
MAJOR TUNE UP - DISTRIBUTOR CAP - IGNITION ROTOR - SPARK PLUGS and IGNITION WIRES
A major tune up on a 1986-1991 Mercedes-Benz V8 Sedan consist of new spark plugs, ignition wires, distributor cap, and ignition rotor.
This photo below shows all of the parts needed to perform a Major tune-up


BUY A MAJOR TUNE UP KIT FROM AUTO-TREND REPAIRS AND SERVICE! CLICK HERE $399.99 + Shipping
Here at the shop we like to stick with the Bosch line of replacement parts. We have researched several other competing brands and
we have found that the Bosch line is by far the best valve and quality for the Mercedes-Benz 420/560. Performing a major tune up can increase
the gas mileage and performance of your Mercedes and a major tune up should be performed every 60,000 miles with a minor tune up consisting
of changing just the plugs every 30,000. Adhering to this schedule for your tune-ups should help to ensure your Mercedes is running at peak
performance throughout your ownership.
To perform a major tune up on your Mercedes you will need the following tools -
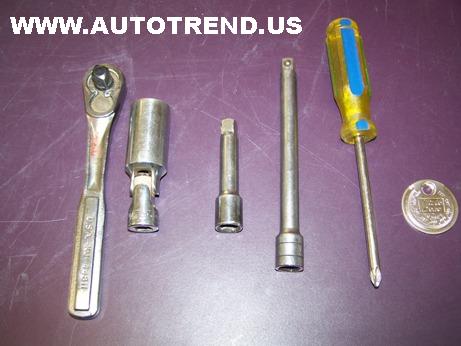
In order from left to right we have a standard 3/8 ratchet (Craftsman Brand Shown) , a 13/16 deep well universal socket 3/8 drive
(Snap-On Brand Shown) , a few small 3/8 drive extensions 4 inch - 6 inch shown , a Philips screwdriver, a spark plug gaper,
a small 4 inch piece of 3/8 rubber hose (not shown), a 10 mm wrench or socket (not shown), pair of pliers (not shown) and a timing light (not shown).
We recommend a 3/8 piece of hose to ease the installation of the spark plugs, timing IS NOT adjustable but we recommend checking it.
To start off the tune up you should gather all eight of your spark plugs and gap them to the suggested spark plug gap in the chart above.
To do this place your spark plug gaper in the center of the electrode and ground. Gently walk the plug around until you start to feel resistance.
When you feel resistance check the number on the tool to see what the gap is.

In this photo you can see that the spark plug gap is set at .035 thousandths. For our vehicle this is the correct gap. In the event you find your spark
plugs to exceed or fall short of the recommended gap you must open or close the gap. This photo below shows us opening the gap of a spark plug.

You only want to adjust/bend the ground electrode (curved part that looks like a lower case r ). Do not try any alter the center electrode and be
careful when gapping not to crack the porcelain insulator on the electrode or tops of the spark plugs.
Now it is time to unscrew the tops of the spark plugs. Do this with a pair of pliers. You must remove the tops of these plugs in order for the
factory style wires to work. Turn counter-clockwise (To the left) until it is removed. Do this to all 8 plugs and discard tops.

Until it comes all the way off like this

After this you are ready to get started. Open the hood of your vehicle and remove the air cleaner. There are two 10mm nuts holding the
air cleaner down on either sides. Depending on your model you may have one or two air snorkel tubes that simply disconnect up towards
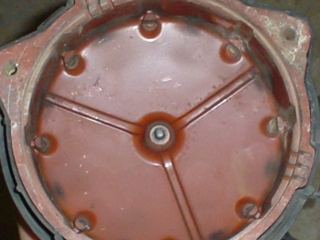
the radiator. After that you will should remove the distributor cap shield, this is a plastic cover that keeps water from getting on the
distributor cap.

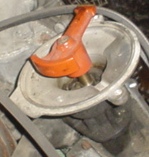
Remove plastic cover by squeezing in where the three retain tabs are and pulling upward. Some vehicles may not have this cap, if that's
the case contact us as we have many used ones we can sell. This is what it will look like once the cover is removed.

DO-NOT REMOVE ANY OF THE SPARK PLUG WIRES UNTIL LATER!
On both the left and right sides there will be two wire loom retain clamps held on by 10mm bolts. You must remove the 10mm bolt and cut
the plastic loom (if still present) so that you can easily remove the old wires and re-route the new ones.

At this time you will want to get your Philips screw driver and remove the three retaining bolts that hold the distributor cap down.
Be sure to be careful as sometimes they are very tight and the heads will strip out if you do not have a good bite with the screwdriver.
Now it is time to lift up on the cap and lay it over so that the wires still remain connected to the cap
Now you will have a clear view of the distributor rotor. You remove it by unscrewing the 10mm bolt that is on the lower shaft/side.
Once you have the old one removed immediately re-install the new one in the reverse order. The rotor is slotted so be sure that it is fully installed in
the proper position. Be sure not to forget to install the locking bolt back into the lower shaft as this will ensure that the rotor is properly installed.
Tighten the 10mm bolt until snug but do not over tighten. Immedialy install the new distributor cap following the rotor. Be careful not to damage the
center electrode located in the center of the distributor cap.
It is now time to start replacing the plug wires and spark plugs. You should do this process ONE AT A TIME to ensure that you do not cross
any wires and mess up the firing order. I find it is much faster and a lot less chance for error doing one plug wire and spark plug at a time. Since the
old cap is still connected to the wires remove one wire from the distributor cap and follow it down to the plug. Remove the spark plug lead end of the
wire and measure it against your new wires. Once you have found a match discard the old wire and prepare to remove the spark plug with your 13/16
universal socket and 3/8 drive ratchet. To remove the spark plugs you will turn counter clockwise (to the left). At first there will be a fair amount of
resistance but once its broken free it should spin out rather easy. It is important to keep the socket at straight as possible for the initial breaking
loose of the sparkplug. Having the universal socket cocked too much one way can cause binding and in worse cases you can strip out the threads.

Once the spark plug is removed grab your small piece of 3/8 vacuum hose and one of your already gapped spark plugs. Insert the
non-threaded top portion of the spark plug in the rubber hose. Be sure its secure in the rubber hose then by hand thread the new spark
plug into the hole as far as you can. Be sure the spark plug is not cross threading. You should get at least 1/2 turn by hand before you
go back to using the socket wrench. Once you have established the plug is in pull the rubber hose off the spark plug. If the plug stays in
you are ready to tighten the plug. Be sure you are very careful when tightening the spark plugs not to break or crack the porcelain
insulator. Keeping the socket straight and not over torqueing will help prevent that from happening. Plugs should be snug, anywhere from
22-28 ft lbs. Once the spark plug is tight you will install the wire that you measured. Pay attention to the cap and place the wire in the same spot
on the new distributor cap, as you pulled it from the old distributor cap. Proceed on in this manor until all eight plugs and wires have been
replaced. Once finished installing the plugs and wires you will need to replace the ignition coil wire. The ignition coil wire is the one right in the
center of the distributor cap and it runs down across the drivers side and mounts near the ABS pump. Normally there is also a plastic cover
on the coil too. It can be removed by unclipping it and lifting up. Follow the ignition coil wire if you are having a hard time finding it.

Once finished with that be sure that all old parts and anything that could get caught up in the engine are out of the way. Start the vehicle to ensure
that it runs smooth. If the vehicle fails to start you may have crossed a wire. Refer to the quick specs at the top of this page to check the
firing order. Once finished install all covers and air cleaner. You can now check the ignition timing with your timing light if you have one.
The timing on the 1986-1991 Mercedes-Benz V8's are computer controlled and not adjustable, so you will only be able to check the timing, not
change it. Providing that everything runs and checks out good you can install the plastic covers and enjoy 30,000 miles of silky smooth driving.
If you need help with any of our instructions you can visit our public web forum http://www.benzworld.us
You can also read more about tune ups by clicking this link here.
** While we use this process here in our shop, use of this information is at your own risk. **
This site best viewed with Internet Explorer 6.0 & up @ 1024X760 Resolution with Medium Browser Text size. click here
(C) Stellar Enterprise LLC dba Auto-Trend Repairs & Service 2001
Plymouth Michigan 48170 1-734-250-4449 autotrend@sellc.us